Reverse engineering UEFI firmware to lift evil hardware restrictions
Posted on Aug 24, 2021I recently got a Lenovo ThinkCentre Tiny M93. It’s a cute little device that came with pension documents for several people and is doing great as a cheap NAS. However, the main reason I got it was to replace a Raspberry Pi that I was using as a WiFi access point running Pi-Hole, and the M93 didn’t have a WiFi card when I bought it. Easy enough, I thought, just get a decent Intel mini PCI Express card and some antennas.
Except…
Error 1802: Unauthorized network card is plugged in - Power off and remove the network card.
Which sucks. I completely forgot that this is something that Lenovo has been doing for many years now. It might not be entirely just evil as I have read that they do this because the FCC / CE radio emission tests they do are done with specific hardware and they block other cards to make sure the device is always compliant. In any case, I got the WiFi card from eBay so I can’t return it, which means I’m going to have to hack this thing.
Dumping the boot ROM
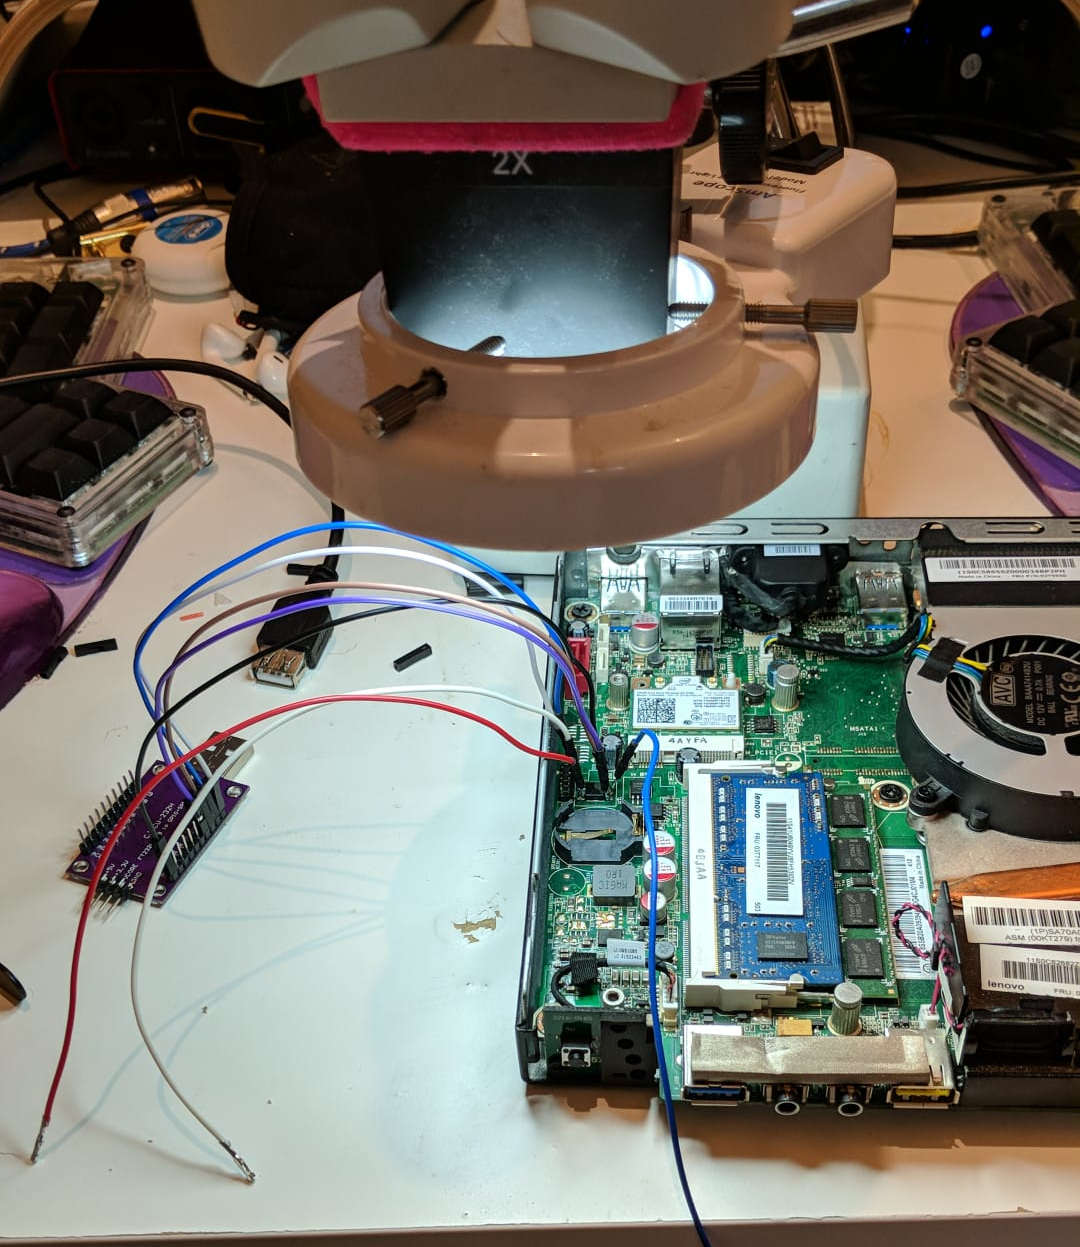
Here’s a quick overview of the setup I used to dump the BIOS. Unfortunately I was very focused and this was the only picture I took of the entire process, so it’ll have to do.
The M93 (as well as many other Lenovo computers) stores the boot ROM in two 8-pin SPI flash chips. In this case, one is 8MB and the other one is 4MB. The interface is the pretty standard 8-pin SPI ROM one and is supported by the programming tool I’m using, the purple board to the left. This is a breakout board for an FT232H, a pretty cool chip that does several things. Of interest today of course is reading and writing SPI ROMs. Flashrom supports this tool.
Then, coming out of it are some wires that go to the flash chips. As you can see I tried to read the chips in-circuit, but obviously the 3.3v line coming out of the FT233H breakout wasn’t enough to power the entire 3.3v rail of the motherboard (duh?).
Naively then, I got my 10A adjustable power supply for the 3.3v rail but for some unknown reason even when powered like that the tool could not read the chip. Powering the entire 3.3v rail externally was sort of a bad idea to begin with, so I decided to move on to the next bad idea: Lifting the 3.3v leg of the chip to power it. Hopefully I don’t need to explain why this is not ideal, especially when I didn’t have backups of the ROM.
It was not elegant but it was effective, I managed to read the 4MB chip like this. The 8MB chip was extra difficult however and had to be completely desoldered, which was pretty annoying as I don’t currently have a hot air station. I will leave up to your imagination to figure out how I pulled this off, emphasis on the “pull”. And solder blobs.
Now that I had a couple of binary files, I just had to concatenate them:
% stat final.bin
  File: final.bin
  Size: 12582912 [...]
% file final.bin
final.bin: Intel serial flash for PCH ROM.bin
And then bang, we have a file(1).
UEFITool
This file should be editable with UEFITool. Once open, it should be possible to search for the string (or part of it) that indicates that the WiFi card is not supported. In this case I just searched for “unauthorized” (for some reason searching for the entire string didn’t yield results!).

And sure enough, there is a match. It’s in a section called ErrorMessage, which is promising as that’s what I’m seeing. The section is made out of a Portable Executable, and a couple other things. The match is not in the PE which means that most likely the PE is referencing the error string from the section that has the match. This is annoying because I won’t be able to see exactly where the string is referenced from when I analyse the PE.
Extracting both of these sections, we can do some really basic analysis:
% file emsg.ffs emsg.pe
emsg.ffs: data
emsg.pe:  MS-DOS executable PE32+ executable (DLL) (EFI boot service driver) x86-64, for MS Windows

% strings -el emsg.pe
Setup
SMBIOSMFG
Chs_phy_Sts
ChassisErrorFlag
AMITSESetup
SystemAccess
LastATASNFVMNChecksum
ATAConfigErrorFlag
LastSATA0Mode
OemBoardId
SystemFanState
MemorySizeDecreased
LastMemoryConfig
SysPwdInvalidError
SysSecuritycrcError
InvalidMailBox
LastCheckSum
SetupDataChecksumError
UnauthorSecDataChanged
TPMPresentFlag
BIOSUpdateNVRAMFlag
HardDiskPwdChangedFlag
BIOSSetupDataChangedFlag
BIOSPWDChangedFlag
PowerFanState
SystemFan2State

% strings -el emsg.ffs
[...]
Error 1802: Unauthorized network card is plugged in - Power off and remove the network card.
[...]
Note -el to search for wchar strings.
And well, there’s the error message in the data file. There’s also an
interesting string in the PE file OemBoardId that looks suspiciously related
to the feature I’m trying to disable. It looks like I’m onto something.
Actually reversing the firmware
Anyway, let’s just open it in a disassembler to actually see what happens. I like Cutter because it’s easy to use, but I’m almost certain that the free version of IDA would also work for this.
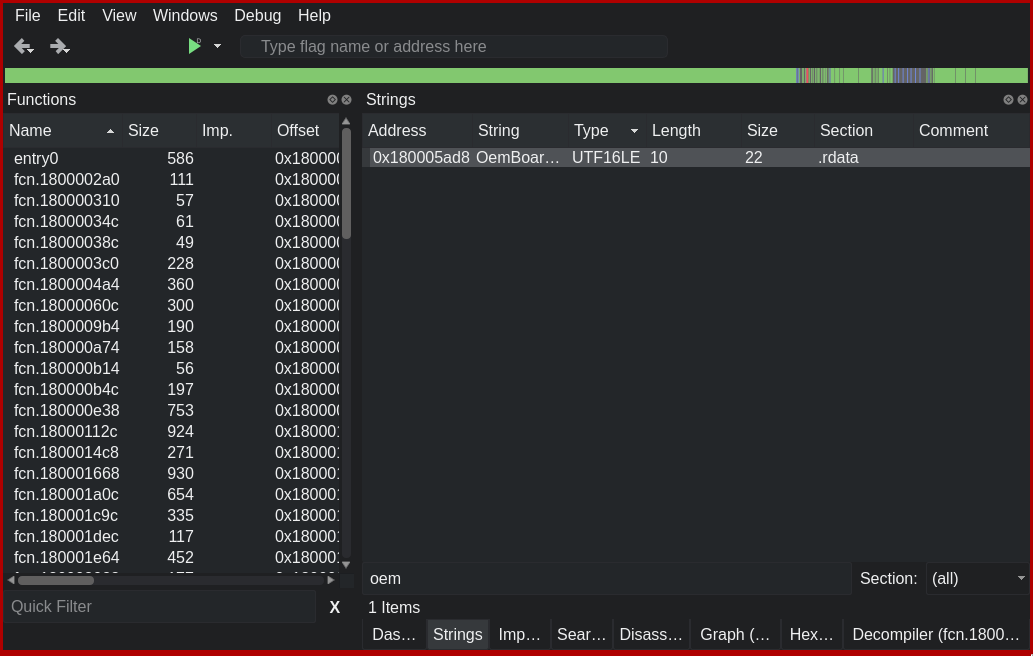
I filter the strings to “oem” and the string that I thought was interesting is right there. It has three references, so I’m going to have a very quick look to see what the context of each of the references is. As a quick reminder, what I’m looking for is something that:
- Checks a single number (HW ID of the card) against several others (the allowed card IDs)
- Could be a loop that checks it against some array, or
- Could be inlined (think if/else for each number)
- Probably goes to an infinite loop if there are no matches
Again, super quick look at each of those references, and the graph for one of these looks like this:
I don’t know what you think, but I think this is pretty obviously checking the HWID of the card. In fact a quick search reveals that those are WiFi card PCI IDs. It also seems to be checking the same IDs more than once. No idea why.
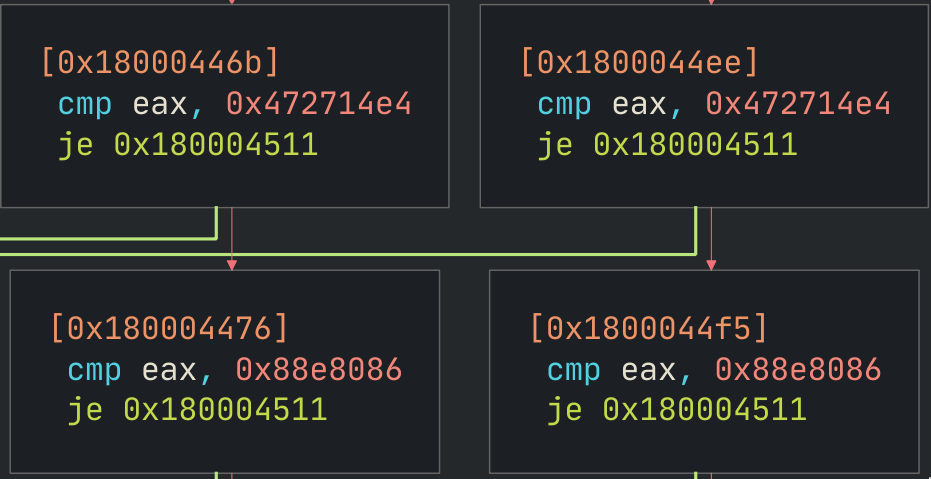 Some Intel card
(8086:088E) and
some Broadcom card
(14E4:4727)
Some Intel card
(8086:088E) and
some Broadcom card
(14E4:4727)
If you don’t find such a graph or a suspiciously obvious string, there’s another way to find this part of the code. Just search the binary for a card ID that is allowed. Remember endianness, so you would search for 0x8680 to find the Intel ones, for example. It’s just a bit more tedious and requires knowing the cards that are allowed but it is definitely doable. I’ve done it.
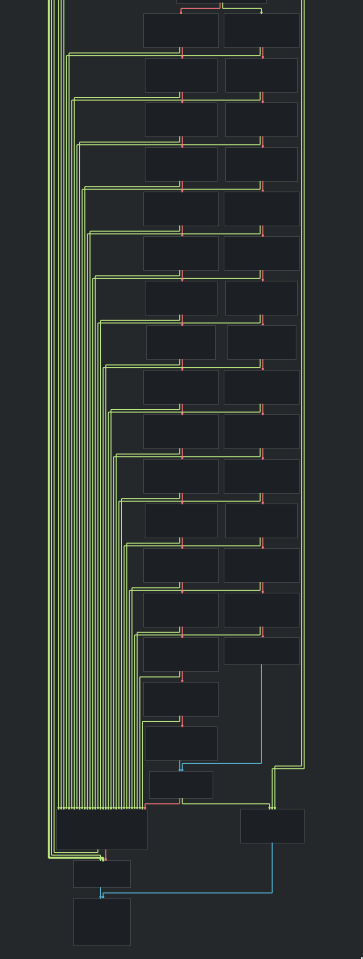
It does not seem like this function goes into an infinite loop if there are no
matches, but the returned value changes. A quick look at the PE calling
convetion shows that rax is the register used for return values. rax is
the same register as al, but al is only the first byte. Looking at this
call graph, it looks like the value of al is set based on the result of the
checks.
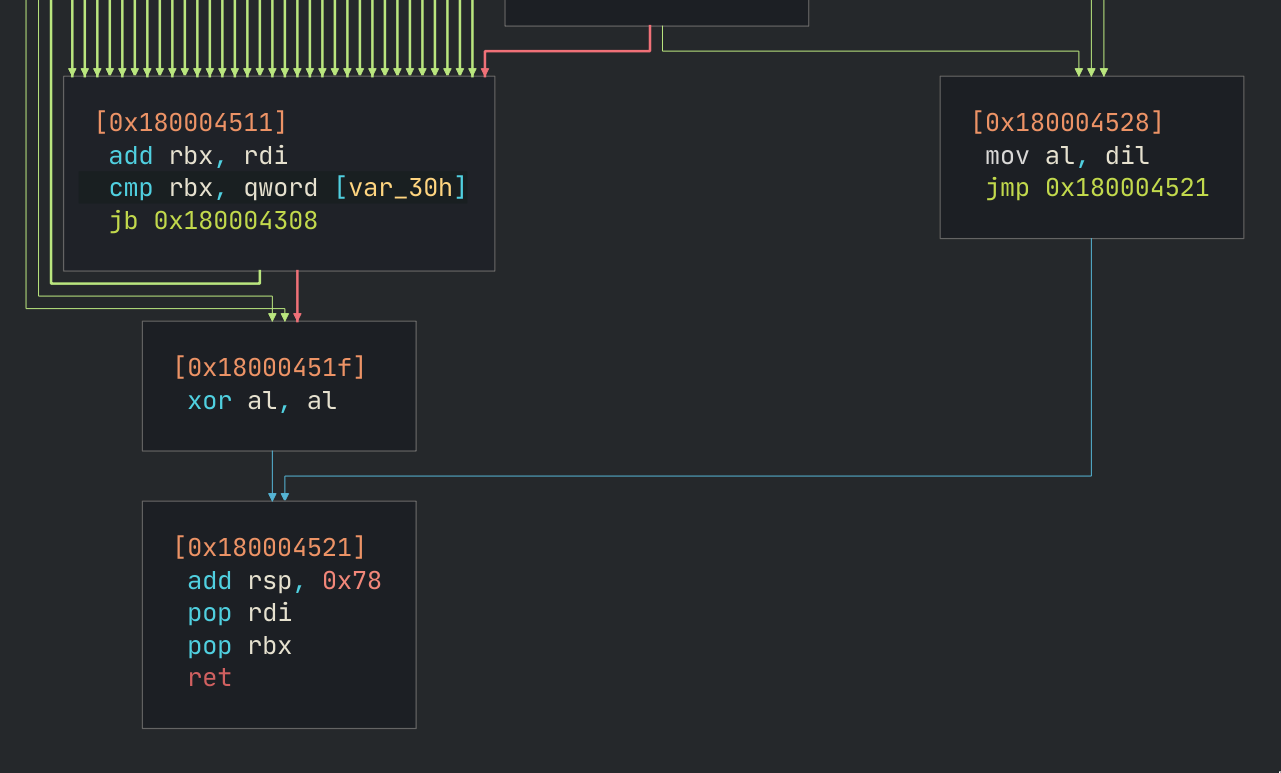
The box with many lines to the left are all the paths from the matching checks,
and the one to the right is reached if every single check failed. Following the
boxes, it looks like al is xor’d with itself when a single check passes,
otherwise it gets the value in dil. What this means is that if the card ID
matches any of the allowed ones, this routine returns 0, otherwise it returns
some other value that is probably not zero. Very C.
At this point there are a few things that can be done to skip the check:
- An instruction could be added so that
alis always 0 beforeret - The PCI IDs in the check could be changed to match the card that I bought
- Step back a bit and investigate how the other two arrows to the
xor al, albox can be reached
And I’m doing the last option because it might be the easiest.
The (slightly) highlighted arrows are pointing towards the desired xor al, al
instruction that we want execution to reach. So it would be possible to just
change jne 0x18000451f with jmp 0x18000451f so that it always jumps.
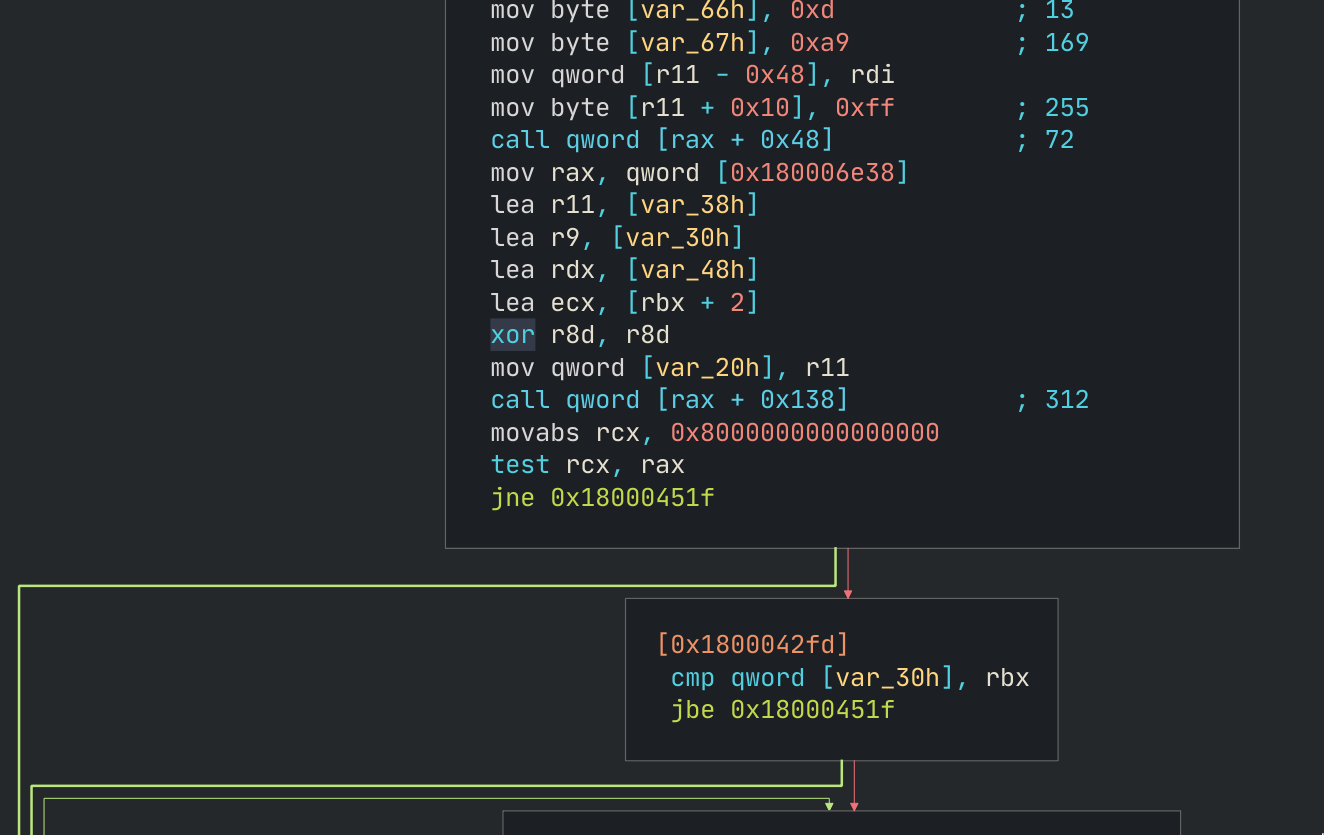
Aside: I suspect that there is a global configuration for the WiFi block but
my understanding of x86 assembler is not good enough so I have no idea exactly
where that is. But that test rcx, rax seems like a good candidate, as it’s
checking whether some bit is set. I’m just not sure where rax is coming from
there. I think it might be coming from the mov rax, qword [0x180006e38]
instruction but I think it might be getting overwritten in the following call qword [rax + 0x138] as rax is considered volatile as per the PE calling
convention. There are all zeros at 0x180006e38, which would seem to indicate
that the branch would not be taken as the bit would not be set.
Anyway, I went with the quick and dirty solution of changing jne to jmp so
that the branch will always be taken and the check skipped.
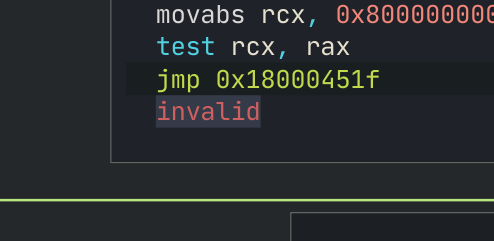 I guess the graph is now all confused as indeed jmp there makes no actual sense.
And with that, I commit the changes to the PE file, and it’s ready to be
flashed back to the ROM. There’s an option on UEFITool to replace a section of
the binary with the updated PE file, which is what I did. Then a little bit of
dd(1) yields the binaries to flash back to the ROMs:
% shasum upper.bin upper_patched.bin lower.bin lower_patched.bin
35dea0a21c184bf0d67f3f5e627f7bad0119c2a9  upper.bin
82db5e7e84b518954d03f54b742421055e4dd2bc  upper_patched.bin
e893b315851c083b406de86e2998f218d2f854b8  lower.bin
e893b315851c083b406de86e2998f218d2f854b8  lower_patched.bin
Except, I only needed to flash one chip! Interestingly, only the upper (4MB) image changed. I used the same programmer and technique(s) as explained above but in reverse and halved to get the ROM back into the chip.
Result
This was one of those times where I was both very surprised and not surprised at all that some hack worked. It would obviously work because the changes to the file were super obvious and the bit that I changed was obviously the check for the PCI IDs, but at the same time it was pretty wild that I managed to get it to work first try. I was 100% expecting a (perhaps temporary) brick.
[user@server ~]$ lspci -nn | grep Wireless
02:00.0 Network controller [0280]: Intel Corporation Wireless 3160 [8086:08b3] (rev 83)
And there it is, all good and working.
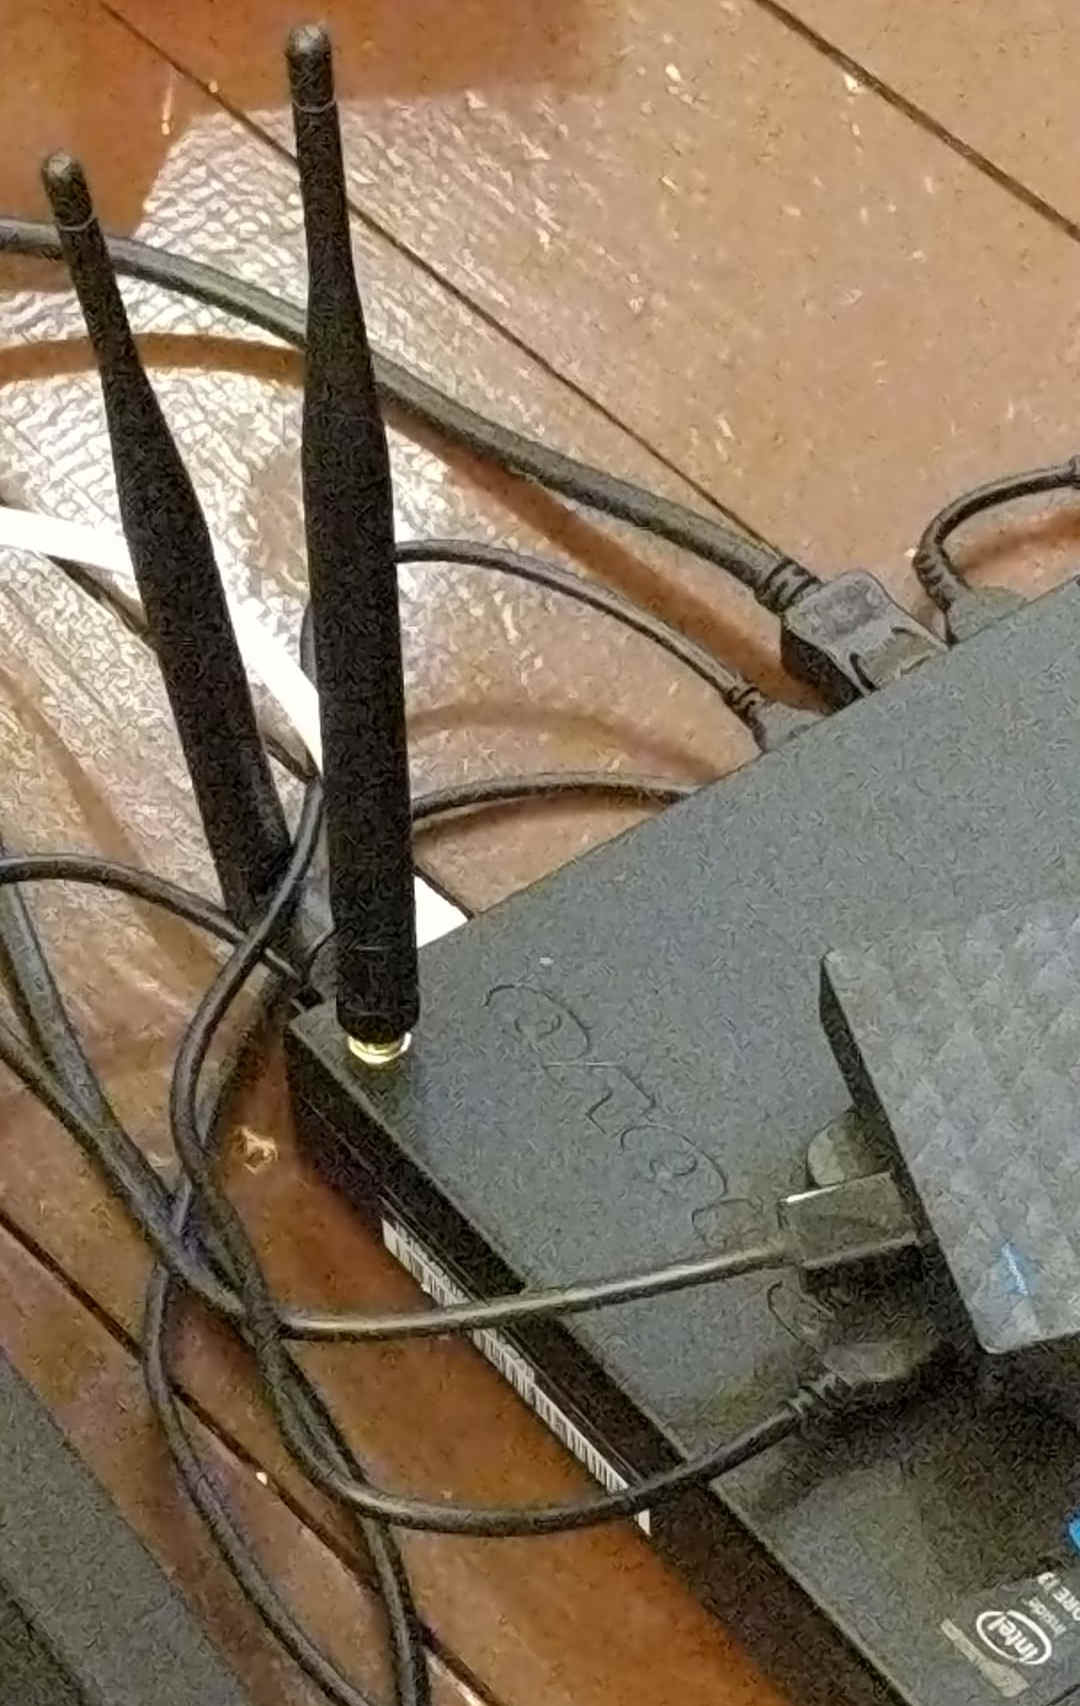 Four drill holes later, two of which were in vain and covered with stickers
because I’m stupid and didn’t notice the antenna wouldn’t fit internally. And
yeah I know that the antennas are probably out of phase or something worse. I
don’t know man, it works.
Four drill holes later, two of which were in vain and covered with stickers
because I’m stupid and didn’t notice the antenna wouldn’t fit internally. And
yeah I know that the antennas are probably out of phase or something worse. I
don’t know man, it works.